
The AquaSketcher is probably the most popular tool on the site. As its name suggests, the purpose of this tool is to help an aquascaper design his next project by making a sketch of what the aquascape will look like. The sketch can then be shown to other aquascapers who can then provide their opinions and suggestions to enhance the initial design. One could also use the AquaSketcher to provide additional description when showcasing his tank.
enjoy, http://www.theaquatools.com/aquasketcher
Popular Posts
-
 http://www.aquatic-eden.com/2007/02/dutch-vs-nature-style-aquariums.html In the world of aquascaping and planted tanks, there are two major...
 -
 What is an aquarium chiller? You have probably heard of aquarium heaters already; equipment that will heat up the water and make it possible...
 -
 http://www.aquatic-eden.com/2007/12/understanding-full-spectrum-aquarium.html Picking the right lighting for your planted aquarium can be in...
 -
 http://www.aquatic-eden.com/2007/04/substrates-for-planted-aquarium.html he Planted Aquarium Choosing the right substrate for your plant...
 -
Hi! Guys! Thanks a ton for following my blog. Fishes Harlequin Rasboras Blue Tetra Plants For plant pics please use this link, http://...
-
 Guys, it was a dream come true for me to compete and then get judged by Amano himself. Great honour for some one like me. I ranked 4th plac...
 -
The Estimative Index - What is it? The Estimative index is a simple method to dose nutrients for any tank without test kits. In a nut shell...
-
The AquaSketcher is probably the most popular tool on the site. As its name suggests, the purpose of this tool is to help an aquascaper desi...
-
 Tank - 12x9x9 inches Light - 72 watts for 10 hours Substrate - ADA Amazonia ii Decoration - Rocks Pressurised Co2 at 1 bubble every second. ...
 -
 2 of my latest creations. One of them got a good rank in the most prestigious International Competition, IAPLC 2012. I am cur...
Wednesday, April 29, 2009
Tuesday, April 21, 2009
Beat the heat - Aquarium Chillers
What is an aquarium chiller?
You have probably heard of aquarium heaters already; equipment that will heat up the water and make it possible to house species that require a higher water temperature than the air surrounding the aquarium
. An aquarium chiller does just the opposite; it chills the water and makes it possible to keep species that need a lower water temperature.
To make it possible for you to set the optimum temperature for your particular aquarium, the aquarium chiller is equipped with a thermostat control unit – just like a heater. When shopping for a chiller, there is more than one solution to choose among. A single-stage controller will control only the chiller, while a dual-stage controller will control a chiller AND a heater. It might sound strange, but in many situations you may need to use a chiller as well as a heater to keep the correct water temperature in the aquarium and a dual-stage controller will help minimize variance and eliminate conflicts between the two.
When do I need an aquarium chiller?
You need an aquarium chiller when the ambient room temperature is higher than the desired water temperature. This can be due to many reasons, such as:
• You wish to keep cold water species indoor and decreasing your indoor temperature low enough is not an option.
• You live in an area subjected to seasonal heat-spells that increase room temperature and wreck sudden havoc in your aquarium.
• You live in a warm part of the world and decreasing your indoor temperature low enough is not an option.
• You have installed heat emitting equipment that increase the water temperature, e.g. pumps and lights.
Many people think that aquarium chillers are only necessary if you wish to keep species from temperate or arctic parts of the world, but this is very far from the truth. A subtropical species used to a water temperature of 18-25°C can for instance suffer if a sudden heat spell turns the air temperature in your house up to 30°C. Also keep in mind that the water temperature tends to drop sharply with depth and deep-water species can therefore require really chilly water even if they hail from the tropics.
Tips and aquarium chiller recommendations
• A common mistake is to unplug the aquarium heater when a chiller is used. This is usually not a good idea, because an unplugged heater can cause the temperature to drop too far, e.g. if the weather suddenly changes or if you live in a part of the world where the days are hot and the nights cooler. A properly working heater with a thermostat will shut off as soon as the water has become warm enough and it can therefore be used together with a chiller.
• The chiller itself will actually emit quite a lot of heat. It is therefore not a good idea to enclose the chiller or place it inside aquarium furniture unless the furniture is very well ventilated.
• When choosing between two chillers, go for the more powerful one. You will usually get more bang for your buck by purchasing a really powerful chiller. Even weak chillers tend to be quite expensive, and the price does not increase proportionally to capacity as you upgrade to a more powerful piece. By getting a chiller that is more powerful than the minimum recommendation for your aquarium, you will normally end up with a chiller that lasts much longer before it has to be replaced than a weaker chiller would.
• If noise is a factor, try to find out beforehand how much noise the chiller will make, e.g. by reading reviews, asking questions in aquarium forums, contacting your local fish club, or asking the seller to test-run several chillers in the store before you make a purchase. Chillers can be quite noisy.
Water chillers and marine aquariums
Water chillers are more commonly used by marine aquarists than freshwater aquarists, due to several reasons. To being with, a given volume of saltwater is capable of holding far less dissolved oxygen than an equal amount of freshwater at the same temperature. When the temperature starts to increase above recommended levels in an aquarium, it is not always the heat itself that causes a problem for the fish – many fish are instead harmed by a lack of dissolved oxygen in the water. The warmer the water, the lower its capacity for holding dissolved oxygen. This is true for both freshwater and saltwater, but since saltwater is capable of holding less dissolved oxygen to begin with the situation tend to become problematic sooner in a marine tank.
Another important reason why chillers tend to be more common in marine aquariums is that so many popular freshwater species are used to fluctuating temperatures and oxygen levels in the wild, or a permanently high temperature and/or a low level of oxygen. A fish that can survive under the scorching sun in a puddle on the African savannah or in a murky algae-infested South-East Asian ditch can usually handle a heat spell in the aquarium without much ado. Quite a few species, such as the Gouramis, has even adapted special organs that make it possible for them to breathe air directly from the atmosphere if the level of dissolved oxygen starts to plummet. In the ocean, a scarcity of oxygen is on the other hand not something that the species have be forced to learned how to deal with, especially not the popular reef species that are common among marine aquarists.
There are naturally exceptions these generalizations; many freshwater species can only be kept within a very limited temperature span and may die if you allow the level of dissolved oxygen to plunge. There are also marine species that can cope well with an increased water temperature as well as a scarcity of oxygen.
Last but not least, marine aquariums tend to be more “equipment-demanding” than freshwater tanks and electric equipment generates heat. Marine aquariums usually require more potent filters and if you wish to keep live corals you are often required to install really potent lighting. When combined, all the equipment can make it necessary to invest in a marine aquarium water chiller.
Generally speaking, live corals should not be exposed to a water temperature above 84 degrees F / 29 degrees C, but the exact recommendation will of course depend on in which environment the coral grows in the wild. The same is true when it comes to fish; always research the preferred water temperature of your particular species and do not combine species used to very dissimilar temperatures.
Water chillers and freshwater aquariums
As mentioned above, freshwater fish tend to be more capable of handling increased or constantly high water temperatures in the aquarium; provided of course that you pick the right species. Always research your particular to find out their temperature preferences and how well they can cope with increased or constantly high water temperatures in the aquarium, as well as with oxygen depletion.
One of the factors that will have a major impact on how high a water temperature your fish can tolerate is the bio-load in the aquarium, i.e. how much waste that is produced and how much water there is to dilute the waste with. The higher the bio-load, the higher the risk of oxygen scarcity as the water temperature increases. Water risk of having to purchase a water chiller for a freshwater aquarium is therefore higher in the following situations:
• Your aquarium is crowded.
• You keep species that eat a lot and produce a lot of waste.
• You keep “messy-eaters”.
• You over-feed.
• You do not have and abundance of thriving plants that can bind organic waste and produce oxygen in the aquarium.
• You do not have efficient filtration (mechanical and biological).
• You are not carrying out frequent water changes.
Types of water chillers
Most types of water chillers for aquarium use fall into one of two broad categories: drop-in water chillers and in-line water chillers.
Drop in water chiller
A drop-in water chiller consists of coils placed in a sump. This type of water cooler does not require any plumbing.
Inline water chiller
An in-line water chiller is quipped with internal cooling coils. Water is pumped out of the aquarium, into the chiller where it is cooled, and then back to the aquarium (or sump). An in-line chiller can be placed away from the aquarium and is therefore easier to hide.
Cheap water chiller
Many aquarists are looking for cheap water chillers, but there are a few things that you need to keep in mind before you simply purchase the cheapest chiller you happen to find. If you want a cheap water chiller, it is important to first determine how much time you are planning on using your chiller. Are you buying a chiller as a back-up to be used for a few exceptionally hot summer days each year or are you planning on using it for longer periods, such as entire summers or even year round? A cheap chiller that might be perfect as a safety measure for sudden, but not very long lasting, heat-spells may very well be highly unsuitable for aquarists in need of long-term chilling. Constantly having to fix or replace cheap water chillers can be quite expensive in the long run, not to mention the hassle for you and the risk mal-functioning equipment poses to your fish. Instead of focusing on price only, it is better to focus on performance and durability and then try to find the cheapest possible water chiller that still fulfils all your requirements.
Trying to find the perfect water chiller can be tricky, so don’t hesitate to ask others for advice, e.g. by contacting your local fish club or asking questions in an online aquarium forum. When you have figured out roughly what you need, it is time to start shopping for a chiller. Ideally contact more than once aquarium supplier in your area and also do some online research. If you want to find a cheap water chiller without having to sacrifices quality, you should be prepared to contact quite a few vendors. In many cases, you can save yourself considerable amounts of money by ordering your water chiller online. In other cases, a local shop is to be preferred, e.g. if it offers attractive guarantees and speedy repairs if your chiller malfunctions. In a local shop you can also ask the vendor to test-run the chiller for you to check how loud it is.
Premium water chiller
Investing in a premium water chiller is an especially good idea if you use your chiller for more than just a few hot-spell days a year. Unfortunately, a high price does not equal a premium water chiller. Imagine how convenient it would be if all you had to do to get a supreme water chiller was to save up some money and then go for the most expensive chiller possible? The truth is however that you have to do your homework when purchasing a premium water chiller to make sure that you actually get your money's worth. Do not hesitate to ask other fish keepers about their experience with various water chillers in order to get as much unbiased advice as possible before you make a purchase. The Internet is a virtual gold-mine here since it makes it easy to compare opinions and advice from more than one online forum and review site. The Internet can also help you compare the price of premium water chillers from a myriad of different vendors. Before you start comparing prices, it is especially important to ask your fellow fish keepers about the longevity of their own premium water chillers, because a fairly inexpensive model can turn out to be really inexpensive in long run if it gives up the ghost as soon as the guarantee days are over. In addition to this, carefully check the various guarantees offers by different sellers and, if possible, obtain information about how complaining fish keepers have been treated by the seller when their premium chillers began to malfunction.
DIY aquarium chiller
How to make a homemade aquarium chiller

Equipment
• A hand drill
• A ½ inch or 5/16 inch drill bit
• Screwdrivers
• Knife or scissors for cutting tubing and pipes
Materials
• A small refrigerator with a freezer/ice cube tray section. A 1-1/2 cubic feet refrigerator is suitable.
• ½ inch thin-wall PVC pipe. You will need roughly 1 foot.
• Epoxy glue (5-minute)
• PVC fittings. It doesn’t matter if it is threaded or slip.
• 3/8 inch hard plastic tubing. You will need roughly 50-100 feet.
• Silicone sealant suitable for aquarium use.
• A pump/powerhead (powerful enough to pump water through the chiller fast enough)
Overview
Everything is placed in the plastic box inside the refrigerator housing.
The turquoise square on the sketch symbolizes freezer compartment with temperature probe attached to the inside wall of the cooling box.
Point 1: This is where the water will enter from the pump.
Point 2: The water is transported through the 3/8 inch coiled plastic tubing. (The more coils, the better the cooling effect.)
Point 3: This is where the chilled water leaves the chiller.
How to make a homemade aquarium chiller
• Ideally remove the box that isolates the freezer/ice cube tray section from the refrigerator. (In some models, this will unfortunately be virtually impossible.) Leave the temperature probe as it is.
• Drill access holes for plastic tubing on the top. (You can also drill them in the sides; the important thing is to choose access points that are practical for your particular set-up.)
• Prepare two pieces of PVC pipe; roughly 4 inches each.
• Insert the PVC pipes through the access holes.
• Reinforce the pipes with epoxy glue at the access holes.
• Seal with silicon. It is important to seal well.
• Glue or thread the PVC fittings onto the pipes and connect the pipes to the 3/8 inch tubing inside the box (coiling) and outside the box (running from the pump to the chiller and from the chiller to the aquarium/sump).
Important factors to think about
#1: The pump must be powerful enough to keep the water fast flowing; otherwise it might freeze to ice inside the chilling box.
#2: When the water runs back from the chiller to your aquarium it will be heated up again by room temperature. Using a long piece of plastic tubing between the chiller and the aquarium is therefore not a good idea. If you have to use a long tube, insulate it properly.
How to make a homemade EMERGENCY aquarium chiller
If you need a quick emergency remedy for your over-heated aquarium while putting a more durable construction together or waiting for a ready-made one to arrive, you can try this emergency chiller.
What you’ll need
• A small canister filter with the motor on top
• A bucket
• Plenty of ice
What you’ll do
• Fill the bucket with ice.
• Immerse the lower half of the canister filter in the ice.
• Use the filter as you would use a normal aquarium filter.
• Replace the ice continuously.
As mentioned above, this is just a quick emergency solution– not something that you can relay on in the long run. You have to monitor the temperature in the aquarium closely because this type of emergency aquarium chiller can easily cause dangerous fluctuations in water temperature. DO NOT unplug your heater.
Different Aquarium chiller brands
Below you will find information on some of the aquarium chiller brands that are available on the market today. We list some of the benefits and drawbacks of different brands but we don't recommend any brand over the other as the best choice will depend on your specific situation.
Aqua Logic Aquarium Chillers
Aqua Logic is a San Diego based United State's company founded in 1989. It caters primarily for the live seafood and aquaculture industry, but its products are used by others as well, including hobby aquarists. According to their own company website, their chillers are currently being used "in major public aquariums, the largest marine research labs in the world, and industry where corrosive fluids need to be cooled". This manufacturer is perhaps best known for its long-term development of titanium water chillers, but it produces other types of chillers as well.
As of 2008, Aqua Logic offers four main chiller lines: Delta Star (R), Cyclone (R), Trimline (R), and Multi Temp (R).
If you find it hard to decide between the various chillers, this chiller selection chart from Aqua Logic might be helpful. (It is a pdf-file so you need to have a program capable of opening pdf-files installed on your computer.)
USA Prime Aquarium Chillers
USA Prime offers highly flexible aquarium chillers that can be adapted to suit your needs trough a modular system. This means that you can buy a basic chiller and then modify it to suit your requirements by adding modules such as heaters and ultraviolet sterilizers to it. This will allow you to have the features you need in one stable unit without having to pay for functions you don't need. This system is also designed to save space as several functions can be included in one design.
USA Prime offers a wide variety of different chillers, from small cheap aquarium chillers for small aquariums to sizeable chillers for really large aquariums. The company manufactures several types of aquarium chillers including Nano, Mini, Drop-In, Inline and Tower chillers. All of them come with ABS cover and a digital temperature controller. Aquarium coolers from USA Prime are known to have fairly quiet motors and are fan cooled for good cooling effect and long life span.
Deltec Eco Cooler Aquarium Chiller
Deltec Eco is a line of aquarium chillers that are specially designed to be environmentally friendly and use as little electricity as possible. This makes the Deltec Eco chillers a not only green but also economical choice as they are considerably cheaper to run than many other aquarium chillers. They do not use environmentally dangerous chemicals and are more silent than aquarium coolers using refrigerant cooler.
In a Deltec Eco chiller, the chilling effect is produced by forcing water from the aquarium to evaporate which draws heat from it, thereby cooling it down. This process is much less energy intensive than refrigerant cooling and an Eco cooler system usually uses less than 10% of the electricity used by other chillers to achieve the same chilling effect.
Deltec Eco cooler aquarium chillers might be environmentally friendly and much cheaper to run than other coolers, but unfortunately they are also expensive to buy. They can often be a good investment in the long run but makes for a bigger initial investment.
Deltec Eco has aquarium chillers for both fresh and saltwater aquariums.
Coolworks - IceProbe Aquarium Chiller
The IceProbe chiller is an aquarium chiller produced by CoolWorks. It is designed to be fitted into sumps, overflows, prefilters, and aquarium walls. The IceProbe chiller does not have a thermostat and chills as long as supplied with power. It is a cheap alternative for someone who wants to integrate aquarium chilling in a system they are building but don't want to build their own DIY aquarium chiller. It is highly recommended to add a thermostat that regulates power supply to the IceProbe if building a setup using this chiller. CoolWorks also produce and sell a proportional temperature controllers designed to be used with this chiller.
The IceProbe chiller comes with a 150W effect and several units can be used to achieve better cooling effect in your setup.
Coolworks also produces the MikroChiller aquarium chiller, a smaller chiller designed to be used in nano tanks where it chills the water and increase water movement. It can bring down the temperature in a 10 gallon aquarium up to 4-6 degrees.
Oceanic Aquarium Chiller
Oceanic makes high quality aquarium chillers that by many are considered among the most silent of all chillers. They are not the cheapest brand out there but they often have a long lifespan and have very accurate thermostats that make Oceanic aquarium chillers a good choice when it is important to keep the aquarium temperature very stable. It is possible to connect a heater to Oceanic water chillers turning them into complete climate controls for your aquarium. On the negative side, Oceanic chillers tend to have a sort of plastic look and they are best hidden away in a (well ventilated) cabinet or similar as the LCD displays generate a lot of light. Oceanic is a well-established brand within the hobby the natural choice for many when they want to buy an aquarium chiller, but not a given choice as other individuals prefer other aquarium chiller brands.
TECO SeaChill Chillers
Teco was founded in 1969 and is another very popular aquarium chiller brand that is recommended by many. Chillers from Teco are known to work well and can reduce the temperature in an aquarium quickly. They will usually maintain the temperature stable in an aquarium within 1 degree Fahrenheit. Add-on heaters are available turning the chiller into a complete climate system for you aquarium. UV sterilizations units are also available for Teco SeaChill chillers.
These aquariums chillers are generally speaking running quietly but they are not the most silent aquarium chillers on the market. All Teco SeaChill aquarium chillers have LCD displays. They are very easy to connect and operate.
Many aquarists have told me that these are the best aquarium chillers on the market. I am not going to say that, just that it is a popular brand and a favorite for many. You always have to take your particular preferences into account.
Tunze Aquarium Chiller
Tunze is a company with 45 years of experience selling and producing high quality aquarium equipment. Today they provide aquarium chillers with a low energy consumption and high cooling effect. Tunze aquarium chillers often use 30-50% less electricity compared to other aquarium chillers with the same cooling power. Their energy consumption is not as low as in Deltec Eco coolers but still considerably lower than most other chillers. Tunze aquarium chillers can be fitted with heaters turning them into complete climate control systems for your aquarium.
Courtesy http://www.aquaticcommunity.com/Aquarium-chillers/
Saturday, April 18, 2009
Collection trip April 09 - a report


The announcement of the trip, the route
On 16th March afternoon, my friend and many years senior in the hobby, Madan Subramanium of Bangalore came out with a collection trip plan. Something we were all expecting and looking forward to. This time it was going to be big. No collection trip of this magnitude has ever happened on India soil before. By this magnitude, I mean, a 15 member team, 5 cars, 3 days 2 nights and 1000+ kms of hard core collection.
It was obviously very rigorous and we had covered nealy 50-60 sites for collection. Good to see was every one of us was ready for the ordeal with high level of interest.
The route for the trip was decided to be,
Check the Map for the location
http://www.mapsofindia.com/maps/karnataka/karnatakaphysical.jpg
10th Friday April 2009
Departure Bangalore : Yeshwantpur Metro 0500 Hrs
drive straight to Shimoga and save time. Quick Lunch at Shimoga.
Post Lunch: Shimoga - Manddagadde, Tirthahalli - Habitat study and collection trip begins from this stretch.
Night halt at Tirthahalli.
11th Saturday April 2009
Departure Tirthahalli 0500 Hrs
Tirthahalli - Koppa- Sringeri – Kudremukh* - Koppa – Tirthahalli
*We will be passing through Kudremukh National Park - absolutely no fish catching in the park. We are actually not allowed to even STOP our vehicles when in the park. Time to drive through the park is limited, clocked and verified by the Forest Dept.
Night halt at Tirthahalli
12th Sunday April 2009
Departure Tirthahalli 0500
Tirthahalli - Nagar - Hosanagara - Riponpet - Shimoga - Bangalore
Accomodation at Tirthahalli on both days, ie., 10th and 11th Nights.
Rules, rules and more rules
Well, in collection trip like these there are some rules which has to be adhered to very very strictly to make it a smooth affair. So that, you can accommodate all the spots with some time in hand, you do not have any major health issues etc etc.
The Basic rules that we follow in these collection trip are;
No diversions for tourist spots.
On Time Departures always.
Late comers catch up on the road.
Food as available and when available on the road.
Do not attempt to carry back all the fish you see. If you don't have tanks setup and ready back at home to accommodate the fish when you arrive, don't carry back any fish with you.
These trips are of real fatigue - if at any time, any one wants to break off they are welcomed to do so, collection trip takes priority over all else.
Passengers liaise with car owners for pick location, time, what to carry etc.
How we keep our fish alive
We diligently follow instructions on the trip. Assign one "water changer" per car.
Fish can be kept alive with zero mortality by following instructions strictly. There is no substitute to hardwork.
Things each car carry
Fish nets, Hand nets, Fish bags, Rubber bands, Small 3 liter bucket, Styrofoam boxes, Mug.
Plenty of Drinking water. Snacks. Umbrella, Hand towels, Towels, Dark glasses, Head gear, First AId Kit.
Car Papers and Insurance docs, Driving License. ID card. CASH.
Clothes to carry
Only comfortable clothes. Only cottons. Shorts and T- shirts are the thumb rule.
Plenty of extra inner wear. You will need it.
Proper water proof footwear. Keds/canvas shoes or strap ons.
Keep handy
Always carry a one liter bottle of drinking water by your side. Dehydration is always very high.
If you have delicate skin, get lotions for it. Make sure you use the lotion only when you are not handling the fish or getting into water.
Know your limits.
Model Code of Conduct
1. Prone to car sickness ?, take an Avomin tablet one hour before the trip starts.
2. No booze during the day. Smoking is as per the car owners discretion.
3. Food is last priority, carry food if you want meals on time. Eat same on the drive, no special stoppages.
4. Don't spare anyone, sarcasm & wit rule ! Take & Give back all that you get all day long. No hard feelings at the end of the day.
5. Don't sit with wet clothes on the car seat. Carry a large plastic sheet with you.
6. Do not step bare foot into water. Carry chappals if you are coming in shoes.
Following these simple yet mandatory rules we have managed to have the most satisfying trips while managing to bring back and rejuvenate almost 100% of wild caught live stock.
You can see the tour pictures
http://www.orkut.co.in/Main#Album.aspx?uid=3890438703860345209&aid=1239971381
Hope this helps all you guys. If it helps you, please drop a comment.
Wednesday, April 1, 2009
Understanding Full Spectrum Aquarium Lighting
http://www.aquatic-eden.com/2007/12/understanding-full-spectrum-aquarium.html
 Picking the right lighting for your planted aquarium can be intimidating and confusing. There are so many options to choose from, and so many ways to measure these options. The first step to understanding full spectrum aquarium lighting is to understand what type light your plants need, and what the measurements mean.
Color temperature, measured in Kelvins, is often the easiest measure to find, after wattage. It is a measure of the overall color of the light as it appears to the human eye. Lower color temperatures appear reddish while higher temperatures appear bluish with white in the middle of the range. Often, a temperature between 5000K and 10,000K is recommended for a planted aquarium. However, two bulbs with the same color temperature may in fact be emitting very different light, some more useful to plants than others. This has to do with the different wavelengths of light, and explains why relying on color temperature alone can be misleading.
Visible light is made up of many different wavelengths, mixed together. It's the absorption or reflection of particular wavelengths that produce colors. Plants require certain wavelengths of light to carry out photosynthesis using chlorophyll. The light that chlorophyll absorbs is used to power photosynthesis. By examining the wavelengths of light absorbed by chlorophyll, we can begin to understand the needs of our aquatic plants.
 As shown above, plants need the majority of the light to be around 400-450nm and 650-675nm (or blue and red light). The blue light is used for leaf growth, and promotes bushy, compact growth, while red light is mainly used for flowering and strong stems. They reflect most green light, thus explaining why leaves are green.
Armed with this information, we know that any aquarium light will need to produce large amounts of blue and red light. Most bulb manufacturers include the spectral output graph of their products on or in the packaging. Examine this output graph and try to find a bulb that matches up with the spectral absorption graph for chlorophyll. The closer the match, the better the bulb will be for your plants. For example, the following graph is for a GE 9325K bulb. The bulb matches up fairly well, although the spike at 600nm is not really red enough (650-675nm) for a plant to fully benefit. The blue light spike is however beneficial, and the spike in greenish-yellow light will make the bulb look bright to the human eye.
Although you may not notice a major difference between bulbs, a mix between a color temperature that you like and a spectral output that your plants like will help create healthier plants and a healthier aquarium.
For more in-depth information on the science of full spectrum aquarium lighting, check out this discussion of aquarium lighting science and photosynthesis, or this aquarium light bulb comparison study. For more information on lighting metrics, check out this page on Kelvin, nanometers, PAR, and CRI.
Eheim 2217 Review
http://www.aquatic-eden.com/2006/09/eheim-2217.html
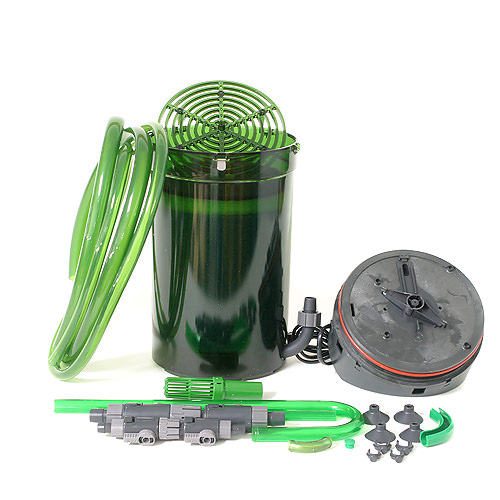
The Eheim 2217 is the largest of the Classic series you can buy. It's rated at 264 gallons per hour and the filter itself is a hefty 6 liters (roughly 1.5 gallons). This is significant because the volume of the filter container determines how much media you can put in and the more media, the more filtering capacity. Many people mistakenly think that the flow is what determines what size tank a filter can handle. Although this holds true in some cases, larger filter volume will always mean larger filtering capacity. It doesn't matter how fast you push water through a tiny container, it will only have so much media that can do the job. Although the 159 gallon rating may be a bit optimistic (like the 2213's 66 gallon rating), this filter can certainly get the job done on any tank below its upper limit.
If anyone asks you why an Eheim is one of the best filters available today, you can point to the flawless German engineering and efficiency. The 2217 only uses 20 watts to push all that flow; comparable filters use 25 or more. There is also absolutely no bypass. The way the filter is designed means that all water must pass through the media. Any dirt that gets sucked up by this filter remains in the filter.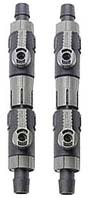 The quality of the parts and construction is top notch. When you clamp the lid onto the container, you know it wouldn't leak, ever. Not even if you tried. In fact, you can even run it without half the clamps and it still won't leak. Priming the 2217 for the first time can be a bit of an ordeal (like any of the Classic series). These filters don't come with any of the fancy self-priming buttons or levers, but they do come with double-tap valves, which make all the difference. However, the first time you set it up, you will funnel (Eheim sells a bulb to do this) or, with much regret, suck on the intake tube. Once you have it filled and running, all you have to do is close the valves on the double-tap connectors, unplug the filter, then separate the connectors. The water remains in the tubing and in the filter, so when you're finished, just reconnect everything, open up the valves, and turn it on. No priming ever again!
 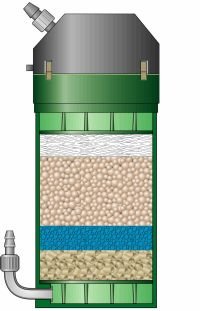 My 2217 came with free media, as I think most do at this point. It came with 1 fine pad, 1 coarse pad, 1 carbon pad, Ehfimech, and Ehfisubstrat Pro. These are all top notch, and the Ehfisubstrat Pro is specially shaped so it doesn't compact and clog. They provide mechanical, biological, and chemical filtration. Again, nothing gets by this media. It also came with tubing and tubing accessories including a spraybar, an intake tube with strainer, and suction cups. It includes a plastic elbow piece which I believe is an alternative to the sparybar, but quite frankly, if you decided to use it it'd be like putting a fire hose in your tank; heaven help the poor fish who unknowingly swims in front of it.
Eheims are probably the best filters you can buy, if you have the money. The 2217 usually retails for around $150 but is well worth it, as these filters have been known to last for decades. I give it five out of five fish:
Pros: Efficient, high quality, no bypass, large filtration capacity
Cons: First time priming can leave a fishy taste in your mouth
Substrates for the Planted Aquarium
http://www.aquatic-eden.com/2007/04/substrates-for-planted-aquarium.html
The most valuable input and feedback on popular planted substrate brands comes from hobbyists themselves, and much of this information has been taken from planted aquarium forums. Therefore, you'll get much more information than just what it says on the label. If you have a chance, do a search for planted aquarium substrate or one of the following brands on a planted aquarium forum, such as Aquatic Plant Central. Just remember to take what you find with a grain of salt, as these are often extremely un-scientific reviews.
One of the top planted aquarium substrates today, Eco-Complete is a balanced, easy to use substrate. It comes populated with beneficial bacteria, so if you are starting a new tank, you can jump-start the cycling process. It also doesn't require rinsing, which is a big pain to have to do, and an even bigger pain later if you don't do it! It comes packed with essential nutrients and minerals required for live plants and shouldn't impact your water parameters (Unless you bought a really old bag, as they did have a few quality problems about a year ago. These can be identified by milky white liquid in the bag, but they will replace the bag for free). The grain sizes are within range for optimal root growth and the appearance is of a deep black sandy gravel. It's also rounded gravel, and poses no threat to bottom feeding fish which may hurt themselves on sharp edged substrate. I use Eco-Complete almost exclusively, and for the price, you can't buy a better substrate in my opinion!
Flourite
$15-20 for a 15lb. bag
Flourite has been around for a while and is not as technologically advanced as other substrates available now but is still an old stand by. It is a clay based substrate with a reddish color that comes from its high iron content. The major drawback with Flourite is that is needs to be rinsed extensively before putting it in the aquarium, otherwise it will severely cloud up the water. It's also larger than other planted substrates and may pose a problem for plants with small, delicate roots. It doesn't have as much or as many minerals and nutrients as other planted aquariums substrates available today. However, you can't really go wrong with Flourite: it's tried and true.
ADA Aquasoil
$26 for a normal type 9L bag (roughly equivalent to a 15lb bag) from ADG
Supposedly the best planted substrate money can buy, Aquasoil is researched and manufactured by Takashi Amano's Japanese company, ADA. There are several different varieties, based on biotopes from around the world. These range from Amazonia to Malaya and Africana, all with different colors and properties to simulate the biotope for which they are named. Made up of round grains, the substrate maintains gaps allowing for water circulation to prevent roots from suffocating, although now they also sell a powdered version to make the top level of the substrate more attractive. It's engineered to lower the pH and general hardness (GH) of the water (this effect is not to be confused with the lowering of pH associated with adding CO2; simply lowering the pH using Aquasoil is not adding any CO2!). Most plants grow better at a lower pH of about 5.5-6.5. If that weren't enough, Aquasoil also acts as a passive filter, capturing floating particles. Nobody knows exactly what it's made of, but it maintains its shape long-term and provides nutrients for root feeders. I haven't been feeling wild enough to start a tank with Aquasoil yet (even though the price is now quite competitive) but others who have swear by it. If you don't have a large tank, or like knowing you bought the best money can buy, Aquasoil is for you.
Soil
Cheap!
Diana Walstad's book, Ecology of the Planted Aquarium, is your bible for using regular potting soil. Most people who use soil are following her methods to create a "el Natural" style aquarium. The benefits of this style is that it requires very little maintenance or fertilizing. However, using soil submerged can be very challenging and there are many ways to do it wrong, leading to certain disaster. Like in nature, a soil substrate does grow plants very well. If you plan to use soil, definitely read her book or ask around on planted aquarium forums for advice!
Regular Inert Gravel
$10-15 for a 20lb bag
Believe it or not, regular intert gravel can also be used quite successfully as a planted aquarium substrate. More intensive fertilization will have to be done to maintain more demanding plants, but it is possible. If going this route, try to get smaller gravel as most gravel sold will be large and difficult to root small delicate plants and stem plants with shallow roots. If you already have an established aquarium with gravel, this is ideal, as the fish mulm has already accumulated in the gravel and will act as a fertilizer. If you are starting from scratch, root tabs or other substrate fertilizers can be used to give plants a boost until the mulm builds up.
Sand
$5 for 20lbs or less
Sand must be used with caution as a planted aquarium substrate. It is very attractive, but has many downsides. First, it tends to compact, making it very difficult for roots to grow into it. Secondly, this compacting can lead to reduced circulation and pockets of anaerobic (not requiring oxygen) bacteria thriving, creating toxic gas bubbles. To prevent this, it's best to either layer one of the other planted aquarium substrates underneath the sand or use a very large grain sand. Overall, sand is best reserved for an accent area, creating a sandy beach effect, and is not ideal for growing plants.
Red Sea FloraBase
I almost bought this planted aquarium substrate as it was attractive and not too expensive. However, I looked up other's thoughts online and found out that although it is a great planted aquarium substrate for the first year or so, it requires replacing (it even says so on the label). Otherwise the granules, shaped similarly to ADA Aquasoil granules, will begin to lose their shape and "melt" into mush. This can be disastrous. Coupled with the fact that changing the substrate in an established tank is all but impossible without totally destroying it, this planted aquarium substrate is one to avoid unless you tear down your aquariums every year.
Laterite (Cat Litter)
This is not really a substrate but more of an additive to substrate. It is a form of clay that contains iron and acts as a sponge to store nutrients, but is meant to be mixed into the existing substrate (usually inert gravel). However, it is clay, and thus gradually softens into a mud-like substance that if disturbed, will cloud your tank dramatically. If, like me, you move plants around frequently, this can mean a cloudy tank all the time.
So these are the top planted aquarium substrates and those to avoid as a planted aquarium substrate. There are many more options, but these are less common and more experimental. You can find an infinite number of combinations of materials and their performances on planted aquarium forums. As for substrate depth, 2-3 inches is generally the rule of thumb. Shallower than that will lead to problems with roots not being able to go deep enough and it will be hard to anchor plants. Much deeper...well why would you make it much deeper? You're keeping a fish tank, not an ant farm! Good luck!
he Planted Aquarium
 Choosing the right substrate for your planted aquarium is an important decision that will have long term affects on your plants. Although the impacts may not be as immediately visible as say lighting or CO2 choices, the substrate in your planted aquarium is a critical part of your aquarium's ecosystem and vital to the health of your plants. There are many different options, all of which have benefits and drawbacks, but I'll highlight some of the most popular options. Overall, there are a few basic requirements that must be met to be appropriate for a planted aquarium:
- A planted aquarium substrate should not be too large or too small (usually between 3-8mm per grain). This is to accommodate root growth; grains that are too small will suffocate and crush roots while large grains won't provide enough contact with the roots.
- A planted aquarium substrate should not affect the water chemistry negatively. Many substrates are designed for other uses, including salt water use, and may leech minerals and salts into the water. For example, crushed coral leeches calcium into the water of an aquarium. This can raise the pH and KH (carbonate hardness) in a freshwater planted aquarium to damaging levels. Substrates that maintain a constant pH level may also be undesirable, as different plants thrive under different conditions, and changing a substrate is probably one of the most difficult procedures to complete in an established aquarium.
The most valuable input and feedback on popular planted substrate brands comes from hobbyists themselves, and much of this information has been taken from planted aquarium forums. Therefore, you'll get much more information than just what it says on the label. If you have a chance, do a search for planted aquarium substrate or one of the following brands on a planted aquarium forum, such as Aquatic Plant Central. Just remember to take what you find with a grain of salt, as these are often extremely un-scientific reviews.
Planted Aquarium Specific Substrates
Eco-Complete
$20-25 for a 20lb. bagOne of the top planted aquarium substrates today, Eco-Complete is a balanced, easy to use substrate. It comes populated with beneficial bacteria, so if you are starting a new tank, you can jump-start the cycling process. It also doesn't require rinsing, which is a big pain to have to do, and an even bigger pain later if you don't do it! It comes packed with essential nutrients and minerals required for live plants and shouldn't impact your water parameters (Unless you bought a really old bag, as they did have a few quality problems about a year ago. These can be identified by milky white liquid in the bag, but they will replace the bag for free). The grain sizes are within range for optimal root growth and the appearance is of a deep black sandy gravel. It's also rounded gravel, and poses no threat to bottom feeding fish which may hurt themselves on sharp edged substrate. I use Eco-Complete almost exclusively, and for the price, you can't buy a better substrate in my opinion!
Flourite
$15-20 for a 15lb. bag
Flourite has been around for a while and is not as technologically advanced as other substrates available now but is still an old stand by. It is a clay based substrate with a reddish color that comes from its high iron content. The major drawback with Flourite is that is needs to be rinsed extensively before putting it in the aquarium, otherwise it will severely cloud up the water. It's also larger than other planted substrates and may pose a problem for plants with small, delicate roots. It doesn't have as much or as many minerals and nutrients as other planted aquariums substrates available today. However, you can't really go wrong with Flourite: it's tried and true.
ADA Aquasoil
$26 for a normal type 9L bag (roughly equivalent to a 15lb bag) from ADG
Supposedly the best planted substrate money can buy, Aquasoil is researched and manufactured by Takashi Amano's Japanese company, ADA. There are several different varieties, based on biotopes from around the world. These range from Amazonia to Malaya and Africana, all with different colors and properties to simulate the biotope for which they are named. Made up of round grains, the substrate maintains gaps allowing for water circulation to prevent roots from suffocating, although now they also sell a powdered version to make the top level of the substrate more attractive. It's engineered to lower the pH and general hardness (GH) of the water (this effect is not to be confused with the lowering of pH associated with adding CO2; simply lowering the pH using Aquasoil is not adding any CO2!). Most plants grow better at a lower pH of about 5.5-6.5. If that weren't enough, Aquasoil also acts as a passive filter, capturing floating particles. Nobody knows exactly what it's made of, but it maintains its shape long-term and provides nutrients for root feeders. I haven't been feeling wild enough to start a tank with Aquasoil yet (even though the price is now quite competitive) but others who have swear by it. If you don't have a large tank, or like knowing you bought the best money can buy, Aquasoil is for you.
Soil
Cheap!
Diana Walstad's book, Ecology of the Planted Aquarium, is your bible for using regular potting soil. Most people who use soil are following her methods to create a "el Natural" style aquarium. The benefits of this style is that it requires very little maintenance or fertilizing. However, using soil submerged can be very challenging and there are many ways to do it wrong, leading to certain disaster. Like in nature, a soil substrate does grow plants very well. If you plan to use soil, definitely read her book or ask around on planted aquarium forums for advice!
Traditional Substrates
Regular Inert Gravel
$10-15 for a 20lb bag
Believe it or not, regular intert gravel can also be used quite successfully as a planted aquarium substrate. More intensive fertilization will have to be done to maintain more demanding plants, but it is possible. If going this route, try to get smaller gravel as most gravel sold will be large and difficult to root small delicate plants and stem plants with shallow roots. If you already have an established aquarium with gravel, this is ideal, as the fish mulm has already accumulated in the gravel and will act as a fertilizer. If you are starting from scratch, root tabs or other substrate fertilizers can be used to give plants a boost until the mulm builds up.
Sand
$5 for 20lbs or less
Sand must be used with caution as a planted aquarium substrate. It is very attractive, but has many downsides. First, it tends to compact, making it very difficult for roots to grow into it. Secondly, this compacting can lead to reduced circulation and pockets of anaerobic (not requiring oxygen) bacteria thriving, creating toxic gas bubbles. To prevent this, it's best to either layer one of the other planted aquarium substrates underneath the sand or use a very large grain sand. Overall, sand is best reserved for an accent area, creating a sandy beach effect, and is not ideal for growing plants.
Substrates to Avoid
Red Sea FloraBase
I almost bought this planted aquarium substrate as it was attractive and not too expensive. However, I looked up other's thoughts online and found out that although it is a great planted aquarium substrate for the first year or so, it requires replacing (it even says so on the label). Otherwise the granules, shaped similarly to ADA Aquasoil granules, will begin to lose their shape and "melt" into mush. This can be disastrous. Coupled with the fact that changing the substrate in an established tank is all but impossible without totally destroying it, this planted aquarium substrate is one to avoid unless you tear down your aquariums every year.
Laterite (Cat Litter)
This is not really a substrate but more of an additive to substrate. It is a form of clay that contains iron and acts as a sponge to store nutrients, but is meant to be mixed into the existing substrate (usually inert gravel). However, it is clay, and thus gradually softens into a mud-like substance that if disturbed, will cloud your tank dramatically. If, like me, you move plants around frequently, this can mean a cloudy tank all the time.
So these are the top planted aquarium substrates and those to avoid as a planted aquarium substrate. There are many more options, but these are less common and more experimental. You can find an infinite number of combinations of materials and their performances on planted aquarium forums. As for substrate depth, 2-3 inches is generally the rule of thumb. Shallower than that will lead to problems with roots not being able to go deep enough and it will be hard to anchor plants. Much deeper...well why would you make it much deeper? You're keeping a fish tank, not an ant farm! Good luck!
Dutch Vs. Nature Style Aquariums
http://www.aquatic-eden.com/2007/02/dutch-vs-nature-style-aquariums.html
In the world of aquascaping and planted tanks, there are two major schools of thought: the Dutch style and the Nature style (also called Japanese style, but not to be confused with the el Natural style which is not a style of aquascaping but an entirely separate approach to keeping a planted aquarium). Both are popular styles that are based on the arrangement of plants in the aquarium and the way it is aquascaped and are by no means the only way to aquascape a tank. Most hobbyists choose to loosely follow one school based on their own personal preference of what they think looks better.
Dutch aquariums are an older style of aquascaping, dating back to early 20th century Holland. The style focuses on neat rows of plants radiating out from a central focal point, with lower plants in front and taller plants in the back (creating depth). You'll often see this described as "streets" or "avenues" using plants.
Dutch aquascapes also feature more colorful aquatic plants. They can be likened to a well kept garden, where all the plants are arranged with a purpose and kept well trimmed and defined. It may not be the most natural looking, but it is extremely beautiful and visually interesting. A significant hardscape (rock and/or driftwood) is usually not present or visible. Color, contrast, and the beauty of the individual plants is paramount.
The Nature aquarium style was pioneered by Takashi Amano in the last decade. The style of this type of aquascape is very much focused on nature and imitating both natural landscapes and snapshots of natural environments. This means that a Nature style aquascape can look like a miniature version of a mountain range with tree lined slopes, or like a scene under the surface of a small river.
Hardscape usually plays a role in framing the aquascape or helps to create flow. Nature style aquascapes are often also one of three shapes: concave shaped, convex shaped, or triangular. Concave means that the height of the plants decreases to some central low point, then slopes back up. Convex is the opposite of concave, and is often called an "island" shape since the plants are low on either side but high in the middle. Finally, triangular shaped aquascapes are shaped like a right triangle, and the height of the plants slopes gradually from high on one side of the tank to low on the other. In most Nature style aquascapes, there is only one main focal point and it is almost always positioned according to the Golden Rule. Natural appearance, flow, and other Japanese gardening principles are most important
Within each of these styles there are further sub-styles that I'll explore a little further in another article.
Do's and Don'ts of Water Changes in the Planted Aquarium
http://www.aquatic-eden.com/2007/03/dos-and-donts-of-water-changes-in.html

This got me thinking. Why not write a post on the do's and don'ts of water changes in the planted aquarium? So, here they are:
Do change 30-50% of the aquarium's water every 1-2 weeks. This is variable based on fish load and filtration, but not on the aquarium's size. From 1 gallon to 100 gallons, 30-50% is a good rule of thumb. This removes all the toxins and excess nutrients that build up in the water.
Don't rely on filters to clean the water. Filters don't remove excess nutrients and toxins from the water, they just trap it so it can be removed easier when you clean your filter. However, filters also can't remove many things effectively.
Do make sure the water you use to fill the aquarium back up is the same temperature as the aquarium water. Drastic changes in temperature stress the fish and can lead to disease and even instant death in extreme cases.
Don't forget to add a water conditioner that removes chlorine and/or chloramines if you are using tap water. These can kill fish and even plants if not removed. Water conditioners also often remove heavy metals such as copper that may harm plants and fish.
Do water changes after courses of medication, after stirring up the substrate doing a re-scape, or after accidentally overdosing anything, including fertilizers. Water changes help to "reset" the aquarium by removing dissolved waste and chemicals. They are often a cure-all for many aquarium related problems, and rarely cause harm if done in moderation.
Don't remove more than 50% of the water during a water change if you can help it. Sometimes, more than 50% is needed in extreme cases (such as ammonia spikes or overdoses), but this can put stress on the fish and the beneficial bacteria in the aquarium. It can lead to rapid changes in water parameters (such as pH) that are as stressful to fish as rapid temperature changes.
 I recently received an email from a reader concerning water changes in a small 1 gallon planted aquarium. She was planning on keeping a few Heterandria formosa (tiny live bearing fish, pictured above) and live plants but had some questions about water changes:
But I can't figure out, how often and how much for water changes? Will water changes in this circumstance harm the system more than help it? What do you think?
This got me thinking. Why not write a post on the do's and don'ts of water changes in the planted aquarium? So, here they are:
Do change 30-50% of the aquarium's water every 1-2 weeks. This is variable based on fish load and filtration, but not on the aquarium's size. From 1 gallon to 100 gallons, 30-50% is a good rule of thumb. This removes all the toxins and excess nutrients that build up in the water.
Don't rely on filters to clean the water. Filters don't remove excess nutrients and toxins from the water, they just trap it so it can be removed easier when you clean your filter. However, filters also can't remove many things effectively.
Do make sure the water you use to fill the aquarium back up is the same temperature as the aquarium water. Drastic changes in temperature stress the fish and can lead to disease and even instant death in extreme cases.
Don't forget to add a water conditioner that removes chlorine and/or chloramines if you are using tap water. These can kill fish and even plants if not removed. Water conditioners also often remove heavy metals such as copper that may harm plants and fish.
Do water changes after courses of medication, after stirring up the substrate doing a re-scape, or after accidentally overdosing anything, including fertilizers. Water changes help to "reset" the aquarium by removing dissolved waste and chemicals. They are often a cure-all for many aquarium related problems, and rarely cause harm if done in moderation.
Don't remove more than 50% of the water during a water change if you can help it. Sometimes, more than 50% is needed in extreme cases (such as ammonia spikes or overdoses), but this can put stress on the fish and the beneficial bacteria in the aquarium. It can lead to rapid changes in water parameters (such as pH) that are as stressful to fish as rapid temperature changes.
Benefits of Plants in the Aquarium
http://www.aquatic-eden.com/2007/01/benefits-of-plants-in-aquarium.html
While surfing around the other aquarium websites on the internet, most dealing with fish only freshwater aquariums, I noticed that a large part of keeping a fish only aquarium is trying to overcome the drawbacks of not having live plants. It also made me realize how hard it was to actually keep fish when I still had a fish only aquarium. Diseases such as Ich were commonplace, and although the medicine was available to treat the diseases, I still invariably lost a few fish along the way. This never struck me as strange until now. Instead of desperately trying to keep the fish alive, in a planted aquarium the goal shifts to keeping the plants happy. If the plants are happy, the fish thrive. This is due to the immense benefits that keeping live plants in an aquarium can bring, including:
Aeration - Fish only aquariums are often aerated with an airstone in a desperate attempt to keep oxygen levels high so fish can breathe. In a planted aquarium, as in nature, the live plants provide all the oxygen your fish will ever need through photosynthesis. An airstone and air pump (and all the noise and vibration that go along with them) are unnecessary in a planted aquarium.
Filtration - Power filters, sponge filters, and canister filters are the only means of filtration in a fish only aquarium. It's up to these filters to remove all fish waste and waste produced by excess food. This is achieved through mechanical filtration, chemical filtration (via carbon), and biological filtration (via bacteria growing on the filter media). There are many designs of filters out there and some are better than others, but all suffer from one flaw: if not cleaned properly and regularly, their effectiveness drops. In a planted aquarium, on the other hand, only mechanical filtration is truly needed. Plants can handle chemical and biological filtration fairly well. They absorb chemicals that are harmful to fish (in fact they live off of the chemicals produced by fish waste) and provide a perfect medium for beneficial bacteria to grow on. Of course, plants have their limits of filtration as well and most planted aquariums have a back up filter providing mechanical and biological filtration. Chemical filtration in the form of carbon will remove beneficial compounds and fertilizers needed by plants, and is not advised for a planted aquarium.
Protection - In fish only aquariums, the focus is the fish themselves, and their environment can be somewhat neglected. Not having enough protection can cause fish to be stressed and more succeptable to disease. Although artifical decorations and plants can be bought and put in the aquarium to provide protection and cover for fish, they are inferior to real plants in many ways. First, they provide none of the benefits listed so far aside from a location for beneficial bacteria to colonize. Second, they are much more likely to injure fish. Live plants aren't hard and don't have sharp edges like plastic plants can.
Food Source - The only source of food in a fish only aquarium is the owner of the aquarium (aside from algae for algae eaters). That means the fish are entirely dependent on you and the food you give them. If you don't make wise choices and vary their diet, they may not be as healthy and can become more succeptable to disease. Also, if you forget to feed them, they have no alternative food sources. In a planted aquarium, the fish have a choice. Although not all fish will eat plants, most will pick at the leaves and dead or dying plant matter if no other food is available. It also helps to vary their diet. Many fish are omnivorous and need to eat plant material.
Algae Prevention - Algae is often a problem in fish only aquariums, and although keeping algae eaters and scraping the glass with an algae scraper are ways of combatting some algae, other types of algae are more stubborn. Algae occurs because there are nutrients in the water and there is light (even low light). In a planted aquarium, plants can outcompete algae and use up all of the nutrients in the water. Although this can open up a whole other can of worms while you try to get your light levels and nutrient levels right, once you get your planted aquarium balanced, you will most likely never have to clean the glass or pull algae off the gravel again.
And there you have it. These are only the practical benefits I can think of, there are many many more benefits to owning a planted aquarium, and it's easier than you may think. Even just a few floating plants can make a serious impact in the health of your fish and the tank as a whole. So what are you waiting for? Throw out that noisy air pump and dirty airstone, toss the neon pink plastic plants and cheesy castle decoration, and take the plunge into a planted aquarium. Your fish will thank you!
Subscribe to:
Posts (Atom)