The Estimative Index - What is it?
The Estimative index is a simple method to dose nutrients for any tank without test kits. In a nut shell, the aquarist doses frequently to prevent anything from running out (plant deficiency) and does large weekly water changes to prevent any build up (Plant inhibition). In this manner, we can easily maintain a close approximation or an “estimation index” of the nutrient levels during the week, not too high, not too low and…..no need for a test kit because the accuracy is close and in most cases closer than a test kit. This uses a common habit that most aquarist already are doing and are familiar with, the weekly water change. I’ve done numerous test runs over a week or three week time period using very high light (450 micromoles/m^2/sec @ 8 cm from light source) and many different species of fast growing stem plants. This will give an assumed “maximum uptake
rate”. This rate is important in setting the upper limit of the needs of the plants. Once the aquarist knows this rate, they can be confident that they are not going to run out of any nutrient at most any lighting variable. This “rate” of uptake or dosing is what is truly important rather than maintaining some static “residual” level. A stable range is all that's needed for good healthy growth. This range concept is supported by observations from many people all over th world with a variety of tap water qualities, as well as review of the relevant research in the Barr Report volumes 7 and 8, 2005. This range has proven to be quite large on the upper limits. With a general 50% weekly water change, the aquarist will build up a maximum of 2x the dosing they add per week. So if you want to maintain 10-20ppm of NO3, this is quite easy to do with out ever picking a test kit (see figure 1 below and the example). Similar ranges can be targeted for the other nutrients and narrower ranges can be achieved using the fertilizers diluted in water.
These maximum rates are also variable, but the rates I am suggestion are only a guideline, different plants and different set ups may use more, but the plants will
not run into deficiencies at these rates. The aquarist is not limited to 50% weekly water changes, they can change more precentage, for example 75% and this re sets 75% of the water volume just like making a standard solution for measuring and calibrating a test kit. More frequent water changes can also be performed, but hitting the target set by the aquarist can be achieved relatively easily for those less confident of 50% weekly changes.
Plants can take up more than they need for growth, something called "luxury uptake". The other issue is that a plant might be starved for a nutrient and the uptake rate may be very rapid in the first few weeks then taper off later. This is referred to as “surge uptake”.
Some Typical uptake rates at high light and CO2 levels per day (24 hours):

NO31-4ppmNH4
0.1-0.6ppm(do not dose NH4!It will cause algae)PO40.2-0.6ppm
These rates do not assume that you will show deficiencies if you dose less than this, but adding
more than these rates will not help further plant health.
This is a point that the aquarist needs to understand. Basically, it is extremely unlikely your plants will ever need more than these rates even at high light intensities. Adding enough nutrients to prevent anything from becoming deficient is the goal, not precise uptake and growth requirements.
Note: these ranges and test in this article used Hach or Lamotte test kits and where checked against known standard solutions. Most hobby grade cheap test kits often are inaccurate and create many problems for aquarist. While some may work, it is always a better idea to check the test kit against and known standard. This way you verify the accuracy and this is what is done in research science. Do not assume that a test kit is accurate. This causes a great deal of frustration, confusion and poor horticulture and was one of the main reasons I suggested this idea for dosing.
The need for such precision is not needed as plants have a very wide range of nutrient concentrations (BarrReport volume 5,7 and 8, 2005) that are above the deficiency level before excess nutrients level become problematic (see figure 3). Today I use a much more sophisticated testing method than a Lamotte or Hach test kit, I use a colormetric multiparameter spectrophotometer that is over 100X more precise and accuracte over wider ranges, self test, uses a blank and autocalibrates. This is a very user friendly device and is used to answer specific questions rather than monitoring a "routine" as a matter of practice for the average aquarist but it will not hurt the aquarist in doing so.

I truthfully do not know what levels of NO3 and PO4 (for example) cause problems for plants or induce algae in a fully planted tank. NO3 levels above 40ppm can cause fish health issues. PO4 at very high levels can influence alkalinity (KH) above 5ppm-10ppm.
Clearly these are far beyond the needs of plants and the range makes for a very large target to dose even if the aquarist is off by a factor of 2X.
Lighting is very expensive to measure correctly in an aquarium(I use a PAR meter that measures light in micromoles/m^2/sec) . It is one of the biggest unknown variables in keeping planted tanks, watts/gallon does not tell you much, but rough guides are fine if the aquarist maintain the CO2 and nutrient levels well. Dosing can be done using dosing pumps if the aquarist wishes, but it is relatively easy to do with a good routine. They can later tailor their routine to add “just enough” and further maximize their nutrient dosing to their individual tank’s needs. An important aspect of this method is the knowledge that excess nutrients do not cause algae blooms as so many authors in the past and many today still maintain without having tested this critically in aquariums with a healthy plant biomass. It is a welcomed relief knowing that “excess” phosphate, nitrate and iron do not cause algae blooms.
For many years this has been the assumption but it is incorrect. Ammonium (NH4+) at low levels have been the primary causative agent for algae blooms in terms of an "excess" nutrient. This is why a planted tank using CO2 with moderate to high lighting cannot have enough nitrogen supplied by adding progressively more and more fish to the tank without getting algae blooms. It does not take much ammonium to cause the bloom. If you add NO3 from KNO3 you will not get any algae bloom, if you add even 1/20th of the ammonium you will get a very intense algae bloom. This test can be repeated many times and ran again and again with the same result. Adding NO3 will not induce the bloom. See if you can prove this to yourself.
With the exception of NH4 and urea, higher levels of PO4 (phosphate), K+, potassium, and NO3 to large extent as well (to 20-30ppm or so) and Fe (iron) can be maintained without any negative effects even at extremely high light wattages (e.g. 5.5 w/gal at 30cm depth, using mirrored reflectors, U shaped power compact lamps-450 micromoles @ 8cm distance from the lights, most submersed aquatic plants fully saturate photosynthesis at 600micromoles/m^2/sec or so, at least the one's that have been tested at non limiting CO2 values, other species may have different levels).
The reason I chose this high light intensity was to reduce the time before an algae bloom would occur and prevent competition for light. This is similar to taking a "test drive" at high sppeed in a new vehicle. If algae was to occur due to higher nutrient levels, if would occur when the light, CO2 and nutrients were non limiting for both sets of variables. With less light, down to a point (Light compensation point, the LCP), we can assume less uptake and less issue maintaining a “stable range” of nutrients. It is much more difficult to tease apart the relationships when the rate of growth is slower (e.g. less light), it takes more time to note differences in plant growth and places less stress/growth rate on the system. It also reduces error since the uptake rates are high enough to get good test kit resolution whereas at 1.5-2.0w/gal with normal Fluorescent lights it takes much longer for 5 ppm of NO3 to be removed. Good test kits like Lamotte were used also to increase accuracy in the results. These test kits were tested against a series of known standards to confirm the accuracy. In this manner I could test the ideas with much more confidence. If I chose to test a non CO2 plant tank, this would have taken a very long time with very expensive test kits and methods. Additionally, many of the nutrients would be used up quickly before I had a chance to measure them.
Returning back to non CO2 planted tanks after gaining this knowledge at high light and CO2 enrichment allows some fairly good predictions/correlations of uptake rates for non CO2 planted tanks as well. The rate of uptake is reduced due to less light and less CO2. I generally use about 6 to 1 slower uptake rate ratio for non CO2 tanks but the fish loading can change this ratio. Basically the non CO2 tank grows 6-10x slower than a CO2 enriched tank.
This method is specific for CO2 enriched systems with higher light but works even better with lower light CO2 or SeaChem Excel dosing for carbon enriched tanks or salt water and other tanks needing a certain amount of nutrients. I suggest 30ppm of CO2, while a tank with 2 w/gal might be okay with 15-20ppm, many with power compact bulbs and reflectors need to have their CO2 levels higher, 20-30ppm range is optimal for the lighting period. This was found by adding more CO2 until there was no net gain in plant growth while keeping the nutrient and lighting levels consistent during the testing period. Research on three aquatic weeds showed that the plants will reach and carbon fixing maximum at around 30ppm of CO2 no matter what light intensity is used (Van et al 1976). The maximum CO2 level no matter what light set up you might have is about 30ppm for these three very fast growing weeds, which we can assume have higher CO2 needs/demand than slower growing aquarium plants subjected to less intense lighting than sunlight. While the needs of some plants might exceed some of these parameters, it’s very unlikely that this will occur and I’ve found no evidence to support otherwise having grown close to 300 species of submersed freshwater aquatic macrophytes. The CO2 level is enough to support
non limiting growth, just like PO4, NO3 and traces. So in a sense, CO2 is over dosed since it's an easier target to hit and measure. Adding more will not harm plants and is only limited by fish health and O2 levels.
While many have discussed the merits of nutrients, fasr too many new people fall victim to low CO2,even the expert often gets caught trying to keep a good CO2 level in their tanks from time to time. No nutrient routine will perform well without good stable CO2 or Excel(Seachem).
Using tap waterTap water is cheap and water changes take less time than the testing (salt water is the exception perhaps, salt mixes cost a fair amount money). Water changes also cost less than test kits/testing and are more fool proof method of estimating the nutrient levels in your planted tank when dealing with NO3, Fe and PO4. It's also simpler and requires less knowledge of chemistry and testing against known standards. Plants are most often starved of nutrients and inaccurate test kits are largely responsible. Many people feel tap is unsuitable for plants, this is simply not true. Old myths still abound claiming excess PO4 in tap water causes algae, this has clearly been shown by many hobbyist to be patently false. The tap water has nutrients in it, then you do not have to dose these nearly as much, this is actually a good thing! Why take something out and then add it back again?
Have hard water? Great, you do not have to add any baking soda and GH builder to your tank. Adding enough GH to bring the levels to 3-5 GH degrees will address higher light tank needs over a week's time. You can use SeaChem Equilibrium for this or a mix of CaCl2 (or CaSO4 although it is not as easy to dissolve into water) and MgSO4 at a 4:1 ratio to increase GH. You can add this without knowing what your GH is by adding 1 degree's worth after a weekly water change (or slightly less with less frequent water changes)
Plants prefer soft water? Not so, neither myself or other experience aquarist have found plants that are soft water dependent, although there may be a few exceptions out perhaps 300 species, it is safe to say that plants prefer harder water and there is research to show this is true, (Bowes 1985), (T. Barr, C. Christianson observations of clear hard water springs in Florida, USA and in Brazil). A few plants, about 5 or 6 or so species do seem to prefer softer water, but this is due to KH, GH seems to have little bearing as long as there is enough Ca and Mg. So the GH can be dosed a little higher if in doubt or if you want to check to see if that is causing an issue or not.
KH on the other hand does seem to influence these specific plants(most are
not affected) to about 5-6 degrees. There is really no limit on how low the KH can be for good plant health, but it can make CO2 measurements trickier. There is a way around that though. Still, any plant can be grown at a KH of 5 and a GH of 5-10, or less. This would not be considered "soft" water, actually it would be ideal. Thus unless you desire to grow a few eclectic species, there is no need for RO, nor DI, carbon filtration of the tap water, but doing so will do no harm to the plants as long as there is enough GH for the plants and KH to determine CO2.
Water changes: use Python like bucket less water change systems, or DIY garden hose systems that attach to a faucet for draining a filling. Large diameter drain hoses make quick work for large tanks. Dedicated plumbing also can make the water change very easy. If the tank is far away from the faucet, a longer hose is all that’s needed. Hard plumbed systems and automatic water changers are commonly detailed on the web.
The Problem
#1 Dosing.This can be very tricky when dealing with many variables. Often the suggestion is "buy a test kit" and test to see what your nutrient levels are.
I suggested this almost ten years ago:
http://www.sfbaaps.com/reference/barr_02_01.shtmlThis works well for CO2 (but folks should double check to be sure before proceeding on) and GH but the other nutrients like NO3, K, PO4, iron as a proxy for the traces are more problematic. Often times the poor aquarist chases one nutrient to the next and spends a small fortune and time as well carefully testing each week, or several times each week trying to figure out what is missing. Generally many never find what is wrong after doing all that.
95% of the time is was CO2 levels were too low and the issue had nothing to do with the nutrient dosing routine. Simply doing a large water change removes all the variables, and dosing known amounts back in to the tank of the nutrients effectively re sets the tank each week. Even if you are off by a little, you do not have to worry about running out since the levels I’ve suggested are for high light tanks and you know if the CO2 is in good shape there is no fear of algae from these levels of nutrients in the water column either. Knowing this allows great flexibility and a very simple method to keep a fairly constant level of any nutrients in your tank and no need to test. You can guess the doses for the reminder of the week and then repeat. Chuck Gadd's dosing calculator works well for the chemistry challenged and those wanting to know how much of what to add. See here:
http://www.csd.net/~cgadd/aqua/art_plant_aquacalc.htmThere is no hard and fast rule here when dosing or doing 50% weekly water changes. This method can be applied to water changes once a month or once every two weeks, better more consistent results will be obtained when doing 50% weekly water changes, but a well run tank can go longer without a water change. The aquarist can note plant health and dose slightly less as they gain experience of their individual tank's needs. As they get a feel for the dosing they can tailor the tank's needs further.

This is an exampled for folks using 10ppm of NO3 dosed each week and assuming 0, 25, 50, 75% uptake by plants/bacteria. the maximum build up in this case is 2x the weekly dosing rate. This shows the range in a mathmatical model (thanks Gomer) so that while no test kit is needed by the EI user, a very accurate test has verified these curves and ranges and match well with observations, models and testing methods.
So this begins to get very close to stable nutrients level and much less merely "guess" work.
#2 TestingThis is huge issue for most folks. Test kits cost as much as a filter or much more in some cases. Some folks can afford nice Lamott/Hach kits, most cannot nor wish to invest 300$ in this. Cheaper kits are not offered for K. NO3 kits are very problematic and color reading scales are difficult to assess with cheaper kits. Some folks are color blind. Many folks don't ever want to test and/or feel there's no need to test. I could not get some hobbyist to ever test no matter what I told them to do! I fell into that group for many years. I did as well as I do today but I am much more consistent now and I also know why it works! I know the rates of uptake and have done a lot of testing since my bad old days. I also did large weekly water changes so if I messed up dosing, I always reset the tank each week. I have a relative simple methodology to side step much of the drudgery especially with testing iron and NO3. At issue here is the maintenance of the nutrient levels within a certain range. The focus will be on 2 groups, nitrate (NO3), phosphate (PO4), potassium (K), the so called macro nutrients and the trace elements represented by iron (Fe) as a proxy for the other trace elements that are included in trace nutrient mixes. There are a few specialized test kits and meters available for many of the trace metals and Boron, but virtually no hobbyist ever measures these. So everyone is guessing about the traces as it is, even the most ardent proponent of testing for dosing!
Using teaspoon (Dry powders) and milliliter measurements (liquid solutions) we can be very accurate.
Perhaps a better question is how close to a good range of nutrients do we have to be to have excellent plant growth and no algae?
Using an "estimative index" the accuracy can be as follows for teaspoons and liquids for the traces, note, further accuracy can be achieved by diluting grams of each of these nutrients into DI water and adding mls of a concentrated liquid into their tanks in place of dry powder, but thios does not gain the user much in terms of plant health and growth, which is the main reason to help improve a routine: (+ or -) 5ppm of CO2 is fine in a 20-30ppm range.
(+ or -) 1ppm or so of NO3 is pretty reasonable.
(+ or -) 2ppm of K+ is pretty reasonable.
(+ or -) 0.2ppm of PO4 is pretty reasonable (?)
(+ or -) 0.1ppm of Fe is reasonable (?)
CO2 range 25-35ppm
NO3 range 5-30ppm
K+ range 10-30ppm
PO4 range 1.0-3.0 ppm
Fe 0.2-0.5ppm or higher (?)
GH range 3 degrees ~ 50ppm or higher
Note:PO4 and Fe are two nutrients that are difficult to assess without first assessing the other nutrients. If the NO3, K, and CO2 are in good shape, you can add a fair amount of these within a wide range. I have added to almost 3ppm of PO4 consistently week after week. Plant's response is incredible.
Green spot algae has never been an issue when high PO4 levels are maintained even under high light with Anubias. Adding traces has been a focus for me lately. Many have stuck with the old standby of a residual of 0.1ppm of iron(namelt from the work done developing PMDD). Well what does this residual tell us? Does it tell us what is available to the plants? Is this enough? Do higher doses cause algae?
Setting up a testI can tell from my own experiences that high levels of traces (Fe) have in no way contributed to any algae presence. I double checked the other nutrients before drawing a conclusion. Few hobbyists and it seems no aquarium companies bothered to look at it from this controlled perspective. In order for the aquarist to draw a conclusion about a nutrient, it must be isolated and you must test only for the dependent variable. This is relatively easy using the Estimative Index; essentially they are making a reference solution each week of the proper nutrient levels and guessing closely till they perform another water change. This gives the aquarist a powerful simple and easy to use tool/method to provide a more controlled environment without nearly as much work. At some point the plants will not take up any more traces. Same can be said for PO4. Adding more simply will not improve plant growth any further. Many plants will take up excess, often called “luxury uptake” of nutrients like PO4 and NO3. So it may not improve growth even if the plants are taking in these nutrients. We must be careful not to assume that uptake=growth/need.
This is where the top end of a range should be. No need to waste expensive trace nutrients. Aquarists that have had issues with algae prior may want to try adding the PO4 and then adding more traces in conjunction. This works well even at the very high light levels. If an algal bloom was to occur, it will express itself more rapid and intensely at higher light. I had been dosing large amounts of traces all along since my reference sometime ago had been Karl Schoeler's 0.7ppm recommendation and I felt like a little more might help if the tank was doing well as many recommendations seemed middle of the road. Karen Randall has suggested a number of aquarist in the past found levels of CO2 higher than the commonly suggested 10-15ppm of CO2 although few have come forward to suggest this recently. Although I had tested numerous times and tried to look for some correlation with the test kits for uptake, I became less focused on the testing aspect and came up with what I think is a better method for the traces. I still contend most aquarist under dose the traces a great deal. I was never scared of algae blooms due to in large part all the battles I’d done with algae in the past and then went on to study and induce algal cultures in marine and freshwater. Few hobbyists are willing to destroy their tanks with an algae bloom to figure out why algae are really there. That is what was required to figure out what causes algae and then this process must be repeated to make sure the results are not an isolated case and can be repeated by other researchers elsewhere. Often times, we only test after the algae is already there, often missing what really caused the algae to begin with. So knowing how to repeat the bloom and induce it, is a key role in understanding of the cause of the algae in our tanks.
The estimative partAquarists simply add a set amount of traces to a known volume of water (mls/day/liter of tank volume). If the tank has less plants, low light, this can/may be reduce in frequency but not dosage. A similar pattern can be done for the macro nutrients. In this manner you essentially are making a "reference solution" each time you dose and you assume a certain amount of uptake the other one or two times prior to making a large water change at week's end. If you have low plant density or have low light (two watts or less Normal output FL's) you can get by on once a week. By knowing what the tap water is comprised of and giving the water company a call to find out what the PO4, NO3, K, and Fe levels are, you can replace the water with water changes and use plain old chemistry or Chuck's calculator to figure out what you need for your nutrient levels without a test kit. Even if you are off a little that's okay (see above pluses and minuses). The water utility will have some variation but if you are close to the middle ranges it should still come out fairly close. So imagine a tank where you don't test except for CO2 (pH and KH) and only that once in a while. Everything grows well. No guessing. Sound good? The results certainly are. Tanks never seeing any algae are quite common, 10 years ago, this was not the case.
Aquarists have tried the substrate dosing only method for many years with hit and miss results. Eventually the substrate runs out of the nutrients, then the plants suffer. While you can either tear the tank down and start completely over each year or so, or re-enrich the tank, you generally are left with having to wait till something goes wrong before you do something about it rather than keeping a close level maintained like the water column. Some tanks with moderate/low light and good fish loads can support the plant’s needs without adding macro nutrients for extended periods but that is still dosing, just the rate is slow enough to maintain the plant needs for that lighting/CO2 level, but the algae are far from limited. Anyone with a bloom that has tried to water change the algae away knows that is not true. The other issue about folks that often do not add macro nutrients/traces etc, is many do large water changes. These folks often do not know what their tap water has in it. If it is rich in NO3 and PO4 like many regions of the USA and Europe, then each week they do a large water change, they are adding nutrients and CO2. People wondered why my plants did so well with the water changes I did each week and when they tested found high levels of PO4, I was adding KNO3 and lots of traces and high light and high trace dosing and had no algae and dramatic plant health and growth. Several methods suggest substrate fertilization in the start up phase followed after a period of a few months of slowly adding water column fertilizer. Any long term method eventually becomes a water column dosing method unless the substrate is re enriched or torn down and re fertilized. Substrate nutrient content is extremely difficult to measure while the water column is much easier to measure and dose consistently, providing a more stable nutrient level for the plants.
You can extend this method out to include all the other nutrients like traces and PO4 even KH and GH. You can try whatever you feel is "perfect" for plant growth and experiment around. Good sized weekly water changes are an excellent way to do this and avoid build up and any **dosing** errors or **testing** errors. Test Kits (good ones) are not cheap and many are too inconsistent or do not want to be bothered to use them. This method used KNO3, KH2PO4 and Trace mixes and you can use a variety of trace mixes to try out your own routines. KH2PO4 (Fleet or generic enemas can be substituted, these are sodium phosphate based) and KNO3 are very cheap and traces are relatively cheap unless you have a very large tank, there are cheap dry mix traces available as well. The good thing about this method is that the fertilizers are available the world over, cheap, consistently the same, not brand name aquarium products and thus much cheaper. When I suggest to Wu in Singapore to dose ¼ teaspoon, 1.67 grams of KNO3, he can dose the same thing I use here, he might not be able to get some brand I like here of some aquarium product. So this method can be used the world over, not just in the USA.
A Typical TankA typical routine for a
high light tank with
low fish load:
Volume 80 liters (20 gal high standard tank)
5.5 watts/ gal. - two 55watt 5000K/8800K lamps
CO2-25-30ppm (I turn my CO2 off at night)
Canister filter
Fluorite (any porous iron rich material will do) about 7-10cm depth
A Typical Dosing Routine1/4 teaspoon of KNO3 3-4x a week (every other day)
1/16th-1/32nd teaspoon of KH2PO4 3-4x a week (every other day)
Traces added on off days as the macro nutrients, so 3x a week, 5mls each time.
SeaChem Equilibrium 1/8 teaspoon after water change.
So the aquarist dose only 3 things really, KNO3, KH2PO4 on the day of the water change then every other day there after, traces of the off day till the next week rolls around. Do a 50-70% water change, dose the macro nutrients back, add the traces the following day and repeat. You can slowly back off this amount till you notice plant growth differences to tailor your individual tank’s need, but all you will do is waste some macros and traces by adding more than the plant needs. You should give each change in your routine about 3 weeks before making another change. This will take time but is worth the time spent. It will not cause algae unless you over look something, namely CO2 or under dosing KNO3 which both of these account for about 95% of all algae issues. If you focus on the plant’s needs, the algae will no longer grow. I hope this helps and ends much frustration for the aquatic gardener so then aquarist may focus on aquascaping and growing plants rather than asking how to kill algae. The aquarist does not have to stick with merely a weekly routine with the water changes or accept 50% as their volumes. This will level off the dosing at 2x the dosed amount so that nothing will ever be overdosed beyond 2x the target range.
The math behind this is as follows:
http://fins.actwin.com/aquatic-plan...1/msg00416.htmlExample #1Suppose you dose 10ppm of NO3 total to a tank per week. Assume you do a 50% weekly water change. If you do the math, you find out that:
If you assume that NONE of it is used up, you can build up a maximum of 20 PPM
If you assume that 25%of it is used up, you can build up a maximum of 16 PPM
If you assume that 50%of it is used up, you can build up a maximum of 13.3 PPM
If you assume that 75%of it is used up, you can build up a maximum of 11.4 PPM
The concentration will not be 15ppm with 25% weekly uptake because of the previous week’s build up if factored into the equation.
Typical model nutrient removal experiment graphical data of concentration versus time

- Types of uptake experiments: Problem: cells become saturated w/time so uptake is underestimated at low concentrations. Uptake depends heavily on light, this unit is poorly measured in the aquarium hobby and presents challenges in the field for researchers due to changes over time, seasonal, monthly, daily, minute by minute, second by second (Clouds, sun flecks etc).
- There is a distinction between uptake from the medium and assimilation into organic compounds, especially Nitrogen [NO3-] and [NH4+] and amino acids. This depends on the ability to store inorganic ions, the rate of the enzymatic steps and the cell needs.
- Cells can adapt and acclimate to chronically low nutrient levels by surge uptake capacity (Vm)
- 2 basic models: Monod model: based on external concentrations, which maybe below detection limits but still biologically relevant and the Droop Model which is based on internal concentrations which is often more important and easier to measure since the concentration is higher than the instanenous external concentration. External concentration is a scale problem as well: micro algae may perceive micro patches of nutrients in microliter volumes whereas we measure integrate typically in then milliliter ranges. Put another way, comparing a the elephant and mouse model, both are herbivores: but we are measuring only large scale plant mass(say trees), not the small patches of short lived herbaceous plants that can feed the mouse but if the elephant has to rely on solely, would starve. Some plants are better than others at this uptake also due to surface: volume ratios.
- Myriophyllum has much high surface: volume ratio than Anubias, The surface area to volume ratio allows Myriophyllum to be a much better competitor for nutrients than Anubias in the water column, but the Anubias makes up for this by growing slower and can withstand lower light levels. Adding excess nutrients and CO2 allows both plants to grow well together without competition.
This is typical generalized model for growth and uptake of a variety of autotrophic organisms. Based on Figure 3 above, from a horticultural perspective, it is more productive to provide non limiting conditions (green box-good target range) for aquatic Macrophytes as the target concentration is much wider as well as higher associated growth rates. Maintaining a
set static concentration continuously through time is difficult and impractical to most horticulturists, but a
useable range is rather easy to accomplish. Aquatic macrophyte limiting can be useful when exploring individual species differences and responses, but this is hardly a good method for
stable horticulture. Non limiting nutrient and light levels need to be quite high before inhibition occurs. These inhibitory levels are unknown for many nutrients as far as aquatic Macrophytes are concern and are generally bounded by toxic concentrations to fauna such as fish and invertebrates (see table 1 for more on the maximum ranges tested individually in isolation1). This range provides an enormous useable range that is relatively easy and simple to target to provide stable levels for horticulture. The limiting range is much narrower and more difficult to provide a stable range from a practical standpoint by not providing much error in dosing and loading rates. Since light typically drives uptake rates, lower intensity of light will provide for less error at low limiting nutrient levels as long as the light compensation point is still being met. Generally, lower light intensities near the LCP have a lower range when non limiting nutrients are provided as well. The study done by Tropica showed this with Ricca and Van et al (1986) showed this same result with three submerged aquatic Macrophytes. In both cases from a horticultural perspective, non limiting nutrient levels are superior with more robustness in stable culturing methods with lower light intensity.
The end result is dramatic macrophyte growth and low algae presence with a simple to use method that allows the aquarist a wide range of dosing routines and healthy growth.
While many books and articles will suggest otherwise, higher nutrients levels and relatively low light can provide dramatic growth. All you need to do is test and try it for yourself to see that this is the indeed the case. The theoretical suggestion for the support of their contentions does not follow, nor does the practical experimentation.
Once applied, EI can be very easy to do and cost very little. It is a simple procedure and basically only CO2 related issues affect the tank and plants, effectively ruling out all the nutrients other than CO2.
Additional References:
Bowes G. 1991. Growth in elevated CO2: photosynthetic responses mediated through rubisco. Plant, Cell and Environment, 14: 795-806 (invited review)
Madsen TV, Maberly SC, Bowes G. 1996. Photosynthetic acclimation of submersed angiosperms to CO2 and HCO3-. Aquatic Botany, 53: 15-30
Additional reading:
Canfield, D.E., Jr., K.A. Langeland, M.J. Maceina, W.T. Haller, J.V. Shireman, and J.R. Jones. 1983. Trophic state classification of lakes with aquatic macrophytes. Canadian Journal of Fisheries and Aquatic Sciences 40:1713-1718.
Canfield, D.E., Jr., J.V. Shireman, and J.R. Jones. 1984. Assessing the trophic status of lakes with aquatic macrophytes. pp. 446-451. Proceedings of the Third Annual Conference of the North American Lake Management Society. October. Knoxville, Tennessee. EPA 440/5-84-001.
Canfield, D.E. Jr., and M.V. Hoyer. 1988. Influence of nutrient enrichment and light availability on the abundance of aquatic macrophytes in Florida streams. Canadian Journal of Fisheries and Aquatic Sciences 45:1467-1472.
Canfield, D.E. Jr., E. Phlips, and C.M. Duarte. 1989. Factors influencing the abundance of blue-green algae in Florida lakes. Canadian Journal of Fisheries and Aquatic Sciences 46:1232-1237.
Agusti, S., C.M. Duarte, and D.E. Canfield Jr. 1990. Phytoplankton abundance in Florida lakes: Evidence for the frequent lack of nutrient limitation. Limnology and Oceanography 35:181-188
Bachmann, R. W., M. V. Hoyer, and D. E. Canfield Jr. 2000. Internal heterotrophy following the switch from macrophytes to algae in Lake Apopka, Florida. Hydrobiologia 418: 217-227.
Bachmann, R.W., M.V. Hoyer and D.E. Canfield, Jr. 2004. Aquatic plants and nutrients in Florida lakes. Aquatics: 26(3)4-11
Bachmann, R. W. 2001. The limiting factor concept: What stops growth? Lakeline 21(1):26-28.
Van, T. K., W. T. Haller and G. Bowes. 1976. Comparison of the photosynthetic characteristics of three submersed aquatic plants. Plant Physiol. 58:761-768.
I would like to thank Neil Frank, Karen Randall and especially Steve Dixon for their input over the years as well as Paul Sears and Kevin Conlin, Claus from Tropica, SFBAAPS folks, each added to the development and understanding of EI. It was team effort to address the many algae issues we had at the time.
Copyright Tom Barr 2005
1 Note: this is for individual inhibitory concentration level, not combinations or two or more
Credit http://www.barrreport.com/estimative-index/62-estimative-index-dosing-no-need-test-kits.html


 Picking the right lighting for your planted aquarium can be intimidating and confusing. There are so many options to choose from, and so many ways to measure these options. The first step to understanding full spectrum aquarium lighting is to understand what type light your plants need, and what the measurements mean.
  As shown above, plants need the majority of the light to be around 400-450nm and 650-675nm (or blue and red light). The blue light is used for leaf growth, and promotes bushy, compact growth, while red light is mainly used for flowering and strong stems. They reflect most green light, thus explaining why leaves are green.
  The bulb matches up fairly well, although the spike at 600nm is not really red enough (650-675nm) for a plant to fully benefit. The blue light spike is however beneficial, and the spike in greenish-yellow light will make the bulb look bright to the human eye.
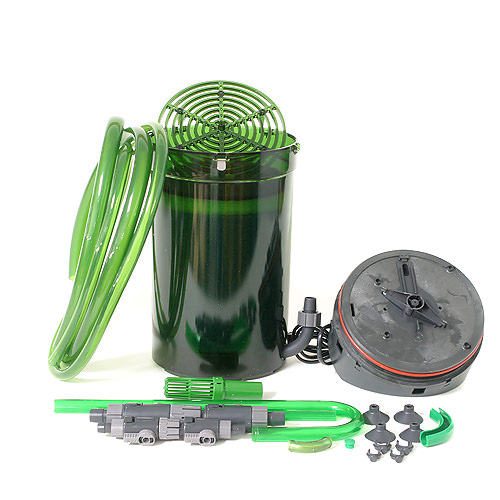
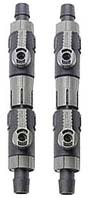 The quality of the parts and construction is top notch. When you clamp the lid onto the container, you know it wouldn't leak, ever. Not even if you tried. In fact, you can even run it without half the clamps and it still won't leak. Priming the 2217 for the first time can be a bit of an ordeal (like any of the Classic series). These filters don't come with any of the fancy self-priming buttons or levers, but they do come with double-tap valves, which make all the difference. However, the first time you set it up, you will funnel (Eheim sells a bulb to do this) or, with much regret, suck on the intake tube. Once you have it filled and running, all you have to do is close the valves on the double-tap connectors, unplug the filter, then separate the connectors. The water remains in the tubing and in the filter, so when you're finished, just reconnect everything, open up the valves, and turn it on. No priming ever again!
 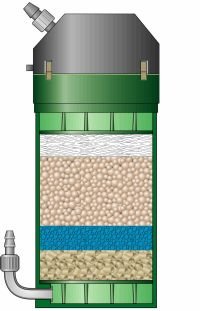 My 2217 came with free media, as I think most do at this point. It came with 1 fine pad, 1 coarse pad, 1 carbon pad, Ehfimech, and Ehfisubstrat Pro. These are all top notch, and the Ehfisubstrat Pro is specially shaped so it doesn't compact and clog. They provide mechanical, biological, and chemical filtration. Again, nothing gets by this media. It also came with tubing and tubing accessories including a spraybar, an intake tube with strainer, and suction cups. It includes a plastic elbow piece which I believe is an alternative to the sparybar, but quite frankly, if you decided to use it it'd be like putting a fire hose in your tank; heaven help the poor fish who unknowingly swims in front of it.